As you work through these cures, designed to rid the beginner, improver and more skilled player of golf’s most common bad shot, you’ll see two themes emerge: poor set-up basics and flawed concepts. Over the years, these two elements have remained at the heart of the slice. While the swing itself gets all the attention, the address position that fundamentally creates it gets woefully overlooked; meanwhile, it is perhaps golf’s chief curse that so many of the things we think we should be doing in the golf swing actually cause its biggest problem shot. So wherever you are in your golfing journey, your path to taming your slice has to begin with checking your beliefs, and checking your address position. Improve in these two areas and that infernal curvature will start to melt away. This article will set you on the right road.
Break 100
Focus on set-up, not swing
When beginners and game improvers slice, their instinct is to change swing mechanics. It feels logical because it appears to be the swing that’s causing the slice. But we need to take a step back from this and understand it’s the address position that causes the swing. Improve your set-up and your swing will follow.
Scare story
Let’s understand how the set-up can lead to slicing through this Frankenstein’s Monster of slicing address issues. Any and all of these can produce a cut…
Ball outside lead foot. Encourages open shoulders and a leftward club path (right-handers), promoting a slice.
High trail shoulder/torso leant forward. Sets a downward and leftward swing path.
Weak grip, lead hand under/trail hand over the handle. Wants to open the face.
Face set open. Directly creates a spin axis that causes the ball to cut or slice.
Low tee. Encourages the downward attack angle that goes hand-in-hand with a slice.
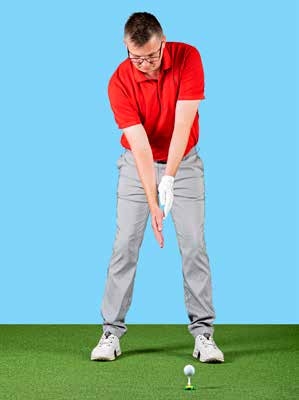
Step 1
For a far better starting position, begin without a club.
Tee the ball an inch higher.
Stand to the ball so it is opposite your lead instep. Feel 55% of your weight under your trail foot.
Let your arms hang, palms facing each other and trail palm facing the target.
Slide your trail hand down a hand’s length.
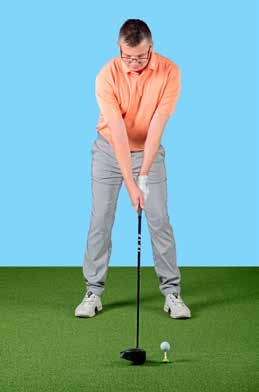
Step 2
Absorb that position, then grip your driver and take up the exact same position. Check the shaft is not leaning forwards or back and that the face is square. Set up like this and you’ll instantly remove the key causes of your slice.
Break 90
‘Line of Pressure’ may not make immediate sense to you, but once I’ve explained this concept, I’m confident it will make a massive difference to your ability to turn a slice into a straight shot, or even a draw. We are talking here about ground pressure, felt under your feet – and we are focusing on transition; backswing into downswing, a notorious weak point around the 90-shooter level. Here’s how it works…
Leftward pressure line
Determined to avoid the dreaded side-on, handsy impact position, so many 90-shooters base their first move down around rotation. Hard rotation from the top sees weight move into the lead heel and trail toes, creating what we can call a ground pressure line that points well left of target for the right-hander. The club’s path is only ever going to follow this line, producing the classic slicer’s out-to-in delivery.
1. Ground work
The first step to eradicating this swing shape is calming the need to rotate. Yes, rotation is a key part of the downswing, but it happens later and more naturally than many club players think. A far more effective transition focus is to get the line of pressure pointing out to the right of the target – weight in your trail heel and lead toe as you start down. To train this, place something under your lead toe and squeeze down on it as you start down.
2. Better path
Just through developing a new, rightward pressure line (right-handers), you can change the whole pattern and path of your delivery – swinging through on a much more neutral path. As this image shows, the fact we’re standing to the side of the ball means we will rotate, with weight moving into the lead heel. But now it’s happening at the right time, much later in the piece. Change your transition pressure line… and change your shape.
Break 80
When we first learn the game, our focus is on developing a motion that is reasonably close to neutral or orthodox. But as we become more adept, we start to understand more about the factors that produce curvature, both leftward and rightward. As our skill develops, we can start to harness these factors, even though they may move us away from ‘neutral’. Setting up a ‘draw bias’ for your driver is a great example. Try this…
1. Turn it down
Closing the face of your club makes it aim left and delofts it. Because of this, it has generally been considered a technical no-no – especially on a club with as little loft as a driver. Yet that is exactly what I’m going to suggest you do here. Hold your driver out in front of you, twist the face so it looks slightly downward, then take your grip.
2. Take your set-up
With the face of the club turned a little closed, tilt forward to address the ball. With the head of the club resting up on its leading edge, the face looking down and shut and the trail shoulder relatively high, this will feel like a pretty poor position to swing from – and it is. So how would you find a more effective starting position from here?
3. Pre-set the draw
To put that club in a squarer and better starting position, pull your trail shoulder back and down. This will create a feeling of being leant away from the target through the torso, and will also give you the feel of your hands being pushed further ahead of your body. This is a set-up that promotes more of an upward and in-to-out path, with the face set strong – and that’s a surefire recipe for a draw. Hit shots from this new set-up. It’ll take some getting used to, but for better players struggling to turn the driver over, it’s an option worth pursuing.